Pj wrote:In my experience costs of DIY projects often escalates, but for me it’s not about building or developing something cheap, instead it’s about achieving something that suits my personal needs and requirements. Since you’ve brought up the Retro 8 scanner from Moviestuff, it costs almost $3000 without shipping; the Lumix mentioned here is $1700, since it’s a camera for taking pictures it doesn’t have to used exclusively for scanning, a projector or transport mechanism is going to be very cheap, the backlight and lens might be expensive, but the total does not have to be as much as $3000.
I would tend to agree with that. But I think the more salient point is that, if you are not counting the value of your time, then you can most likely come up with something better than the Retro-8 for $3000 because you also don't have the overhead of employees, vendors, after sales service, etc that have to be maintained. Every unit we sell has a legacy of warranty and support that a single, custom built unit will never have. But escalating costs are a non issue only if you end up with something that works. For many people, the amount of money spent for hardware on dead end attempts can add up more quickly than imagined. So getting the most out of a DIY scanner project is still going to be balanced against skill. But, if you have the skill and don't include your time as part of the cost, you can build something totally awesome for very little money.
Yep we bought a reto8 and love it. Its totally epic to have a transfer machine that can adjust colour and gamma correction while transferring and we love ours. Its software integration is something we could never make.
Will have to check on the gh4 capture speeds …but I'm sure it could do a few frames per second.
Romote socket is round, i think its a 2.5 min jack but will have to check. Haven't tried to connect to a pc yet.
We are experimenting with the gh4 for 35mm/16mm capture.
If you want something that works straight out of the box without weeks of experimentation, then get a retro8 we are really happy.
I've been using a Canon DSLR for DIY film scanning. For a while now. I chose the Canon for it's programmability (availability of such) and that they are cheaper per pixel than their machine vision cousins. The downside with the DSLR, in terms of film scanning, is the amount of superfluous camera housing around the sensor, making it difficult to mount the camera in a more controllable way. The benefits in a machine vision camera are their size, weight, and the fact that programmability is built into their design (no workarounds required).
I've yet to buy a machine vision camera for film scanning but have been eyeing the Point Grey 4K cmos for a while - however I've lately become more interested in film to film transfers (optical printing). For example: Super8 to 16mm.
For re-registration purposes I've been looking into how to assemble/fabricate a motorised XYZ stage/mount for repositioning the gate during printing (for creative purposes). There are commercial ones with nano-metre (and even pico-metre) adjustability (used in microscopy) but a DIY version would be more fun.
Peizoelectric material can be used to create very small electrically controlled motions (from expansion/contraction of the material). Found these videos, one on growing peizo crystals from commonly available materials, and another on building a speaker using such a material. The latter would become the basis for the fine adjustment control mechanism on the XYZ stage.
mr_x wrote:This is what I do - it's still evolving - capture direct to hard drive then edit in software of choice -
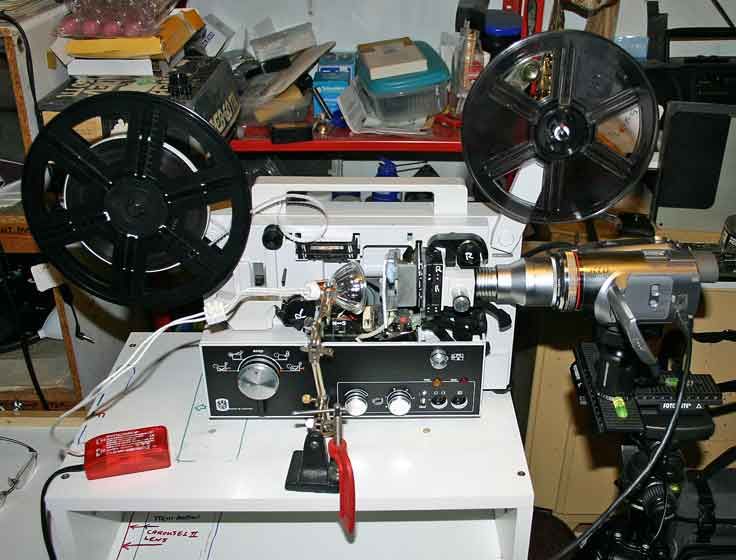
I use a reversed lens on the video camera to transfer 8mm. For 16mm, the film gate is too far away for this arrangement but I am able to video into the regular Bell&Howell lens with no video lens modification at all. That's pure luck, I tried the same thing on a B&H zoom lens and it didn't work out at all. I like transferring in real time, I like the sound and motion of film projectors; beside the sound of cine cameras and classic motor cycles it's one of my favourite sounds
A Kodak carousel lens gets me even closer - reduces the aerial space between me and the raw film - with the addition of a couple of macro filters on the Kodak at the film gate end. The challenge with a TQIII is that the lamp house is set so far back into the projector, no reverse lens arrangement I know of would be long enough to connect the cam to the gate, but this is pretty darn close. 8mm on a Eumig projector is a synch - lamp house so much more forward than the TQ - with a 2.5" reversal lens screwed onto the cam filter.
Yes, the resulting image is delicately salmon-pink on account of the ES bulb behind white perspex in the lamp house. The picture is upside down and back-to-front, so you correct all this in the software, Serif in this instance. Gonna swap the ES bulb for a white LED when I can source all the bits & pieces required for that.
I'm starting to think about how I'll digitize my own 16mm stuff. I don't have a 16mm projector to start with so I'm wondering whether it would be possible to make a little DIY frame stepping device for this, as I did previously for Super 8 film. It's early stages for the 16mm one, but Here's the story so far...
Frame-by-frame capture? Folks do that, the Edwardian Turner film experiment was finally realised by way of single frame imagery set in motion on a computer. It's a great shame they didn't attempt the experiment in real time however, we may never know if Turner's experiment had a hope of working on the equipment then available to him.
Hey, I thought you guys might be interested in my setup. I started with a super 8 scanner, but I recently canibalized that to build a 16mm version (I'll be making a new super8 scanner soon). It uses a stepper motor, Arduino, various sensors and LEDs, and an old Eiki NT-0. Going back to the original question, I decided to go with a machine vision camera for a few reasons. First, it allows you to get raw camera data directly to the computer, and you can also ensure that you capture a frame before you move on. But really it makes it very helpful to have the image on the computer for a few reasons. You can get a realtime live full-size view which greatly helps with focusing. Also, you can do post-processing in real time, like inverting and flipping the image, which also helps with previewing. And in my setup, I added a web-casting functionality so that jpegs of captured frames get uploaded so that I can monitor the capture remotely on my phone (which is helpful because my setup is pretty slow. Like 1fps. Which is actually a lot faster than it used to be!) So I think those are some of the benefits to machine vision.
Okay, some pictures. I call it StepCapture16. [/url]
You can see the whole setup, the vision camera, the macro setup. I'm using a Schneider Kreuznach Componon 80mm enlarger lens.
Here you can see the computer. The software is written in Python and runs in the terminal. There are two preview windows: one is a Live View, and the other a Capture View, which shows the most recently captured frame.
Here's inside the lamphouse. I've got 9 LEDs in an array. I feel like there's some room to improve the lighting setup.
Inside the lamphouse, showing the diffusion. These are just cut out of a Lee Filter sample pack and taped in with scotch tape.
Here's the film path with the front pressure pad swung away.
Same with no flash.
One of the recent tweaks, this is a sonar sensor that checks for rollout. When no more film is detected, it captures 30 more frames and shuts off.
Here are the guts. You can see the stepper motor in the top-right. In front of that you'll notice some tape. That's covering/holding an LED in place. The LED interacts with a light sensor to keep track of the shutter. I'll have a detail of that in a second. Then on the bottom the red chip on the breadboard is the EasyDriver, which drives the stepper motor.
Here we're above the stepper motor looking down. The motor and belt are in the foreground. Just below the belt, a little further back sort of hiding behind that black wire is a light dependent resistor. In front of that is a piece of white tape and a couple of wires coming out of the tape. Under the tape is an LED which shines a light on the light sensor. As the motor turns, the shutter comes between the light sensor and the LED, and the Arduino counts these changes in light. After three passes of the shutter (i.e. one full rotation), the step motor stops and triggers the software to write the current frame to disk as a tiff. Then it advances the motor to the next frame and so on.
And here is some footage:
An old test film I shot with a Beaulieu R16 about a year ago and never had scanned. Tri-x processed as reversal by Spectra.
This is the first footage I've captured since filing out the gate to super16. This is cropped 16x9. Tri-x hand-processed as negative in D-76.
Same footage as above, but overscanned so you can see what came out of the scanner.
The camera (for now) is a Sony XCDU100CR, which outputs 1200x1600 pixels in 10-bits which the software I wrote wraps in 16bit tiffs. Speaking of software, everything except the Arduino sketch is written in Python. I use pyDC1394 to communicate with the camera, and OpenCV to do all the post processing and displaying.
The camera was the most expensive part of the whole project, but all in all the whole thing probably only cost about $350. And it's fairly modular, in that it should work on most projectors, and since it steps and waits for capture as opposed to running at speed, it (theoretically) could be made to work with practically any camera.
The bellows front element controls the focus, and the sliding baseplate that the camera is mounted to effects the zoom. I used to have a two directional setup for a while that the whole rail system was attached to, which allowed control towards and away from the film plane (zoom) as well as adjusting left to right. I may end up using it again one day because it was very useful, but mounting it on top of a tripod made the whole system too shakey. Maybe once I get a more permanent setup.
The bellows front element controls the focus, and the sliding baseplate that the camera is mounted to effects the zoom. I used to have a two directional setup for a while that the whole rail system was attached to, which allowed control towards and away from the film plane (zoom) as well as adjusting left to right. I may end up using it again one day because it was very useful, but mounting it on top of a tripod made the whole system too shakey. Maybe once I get a more permanent setup.
Thanks. Yes, love the film I have a 4 way device mounted on a tripod ball head. Have to keep the cam away from the projector or the motor spoils the focus. For single frame capture that wouldn't be an issue - borrowed my set-up from a single frame tutorial, prior to that used to capture through a magnifying glass and a single surface mirror, it took days just to set up for a 2 minute clip of film, it's much better now, more direct, & the Serif software is very flexible - best software I have yet used.
joshgladstone wrote:Hey, I thought you guys might be interested in my setup [ ... ] Comments and questions welcome!
I think this a great setup. Indeed, if your stepper motor is up to it, the motor could drive the projector as a normal projector, ie. running it at 24 fps. And with feedback from the shutter sensor, and appropriate control logic, you can regulate the motor to hold the projection rate at precisely 24 fps (or any other rate), for however long one likes.
This could allow some silent era film making - shooting at 16 fps, and projecting back at 16 fps (although the lamp might need some dimming to avoid risk of heat damage to the film). There's something hypnotic about 16 fps ... the motion blur ...
Of if the projector mechanisms don't freak out, could shoot film at 48 fps, and project back at 48 fps - for that high frequency look and feel.


 [/url]


