Can anyone reccomend a good free grain FX plug in - and by good I mean - actual grain like shape not just noise.
I'm looking for Photoshop/Premiere or Virtualdub compatability. I've tried a few but not entirely happy so far with the results.
Thanks
Scot
Can anyone reccomend a good free grain FX plug in?
Moderator: Andreas Wideroe
-
Scotness

- Senior member
- Posts: 2630
- Joined: Fri Jan 24, 2003 8:58 pm
- Location: Sunny Queensland, Australia!
- Contact:
Can anyone reccomend a good free grain FX plug in?
Read my science fiction novel The Forest of Life at https://www.amazon.com/gp/product/B01D38AV4K

-
Chinese Belle
- Posts: 70
- Joined: Wed Mar 21, 2007 2:29 am
- Contact:
-
mattias
- Posts: 8356
- Joined: Wed May 15, 2002 1:31 pm
- Location: Gubbängen, Stockholm, Sweden
- Contact:
magic bullet is great. i'm currently beta testing their new looks suite, and it rocks. i think they're about to release it very soon. otherwise you can get creative with noise, blur and composite modes.
one great way is to multiply the image with the noise, then increase the contrast a lot to crush the blacks and blow out the shadows, then desaturate, which gives you a grain pattern with the correct grain distribution (essentially a dithered 1-bit version of the image, in photoshop you can do it that way too). then you blur this a bit and increase the contrast again, which shapes the grain to look more like film grain, then you "add" or "soft light" it to the footage, adjusting the opacity to taste, and reduce the gain or gamma of the original clip to keep it from brightening up. good luck.
/matt
-
Scotness
- Senior member
- Posts: 2630
- Joined: Fri Jan 24, 2003 8:58 pm
- Location: Sunny Queensland, Australia!
- Contact:
Hey thanks Matt - I'll give that a go - I'm doing a bit more post processing on that clip from Hold Me Tight - I found a really good bleach bypass filter http://www.redpawmedia.com/bleachbypass.html however their grain isn't much good - so want to add that seperately.
The funny thing about this filter is that it doesn'twork with Premiere (gives a totally black frame) and in batch mode in Photoshop it stops the whole process waiting for a manual click on the 'okay' button, rather than just taking that as done like every other filter in batch mode. I got around this by using an automatic mouse clicker programme - this is the best one I found http://www.geocities.com/mangokun/autom ... licker.htm A cumbersome way to do it all but kind of fun to nut out.
Here's a few still images with that filter run over it:


Of course if I was good enough at photoshop I'd be able to get this effect anyway - but I'm not that smart. :roll:
Thanks for the magic bullet and after effects suggestions vidwerk and Chinese Belle but I need a cheap method! And I am adding not removing, but thanks for the suggestion anyway.
Scot
The funny thing about this filter is that it doesn'twork with Premiere (gives a totally black frame) and in batch mode in Photoshop it stops the whole process waiting for a manual click on the 'okay' button, rather than just taking that as done like every other filter in batch mode. I got around this by using an automatic mouse clicker programme - this is the best one I found http://www.geocities.com/mangokun/autom ... licker.htm A cumbersome way to do it all but kind of fun to nut out.
Here's a few still images with that filter run over it:
Of course if I was good enough at photoshop I'd be able to get this effect anyway - but I'm not that smart. :roll:
Thanks for the magic bullet and after effects suggestions vidwerk and Chinese Belle but I need a cheap method! And I am adding not removing, but thanks for the suggestion anyway.
Scot
Read my science fiction novel The Forest of Life at https://www.amazon.com/gp/product/B01D38AV4K
-
MovieStuff

- Posts: 6135
- Joined: Wed May 01, 2002 1:07 am
- Real name: Roger Evans
- Location: Kerrville, Texas
- Contact:
Hi, Scott!
I have experimented a lot with fake film grain. Here is a technique that I use that's cheap and only takes a bit of your time to set up. First, create a canvas in Photoshop the size of your target frame. Make it with a white background. Then use the largest airbrush tool set at 20% pressure and on "dissolve". Use it to create about an overlapping pattern of grain like this:
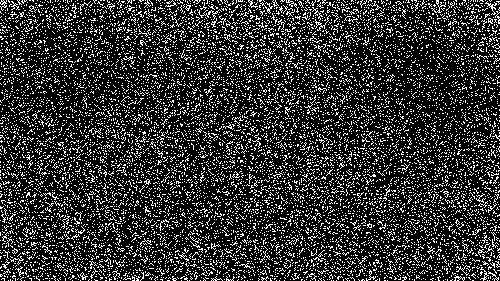
From this you can get four usable frames by flipping horizontally and vertically and saving a copy of each. Thus, if you create, say, 30 of these original frames you can get 120 random grain pattern frames.
Then you number these frames and import them into Premier as an image sequence on the timeline. Then render out a copy and save as an AVI. You can then simply repeat this copy end to end for as long as you wish, then save that as another AVI. Then you'll have a master grain overlay that you can use to add grain to your video clips. You can use a standard overlay, multiply or screen overlay, depending on whether you want white grain, black grain, reversal or negative look. You can also invert the grain, depending on whether the scene has a dark or light background and how you want the grain to stand out. Just play with it until you get the look you want.
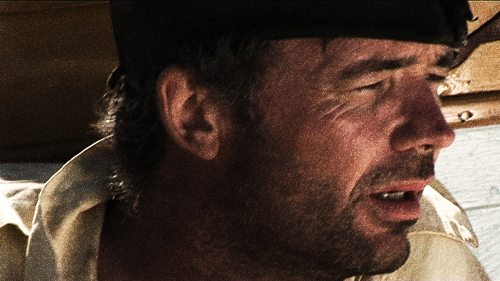
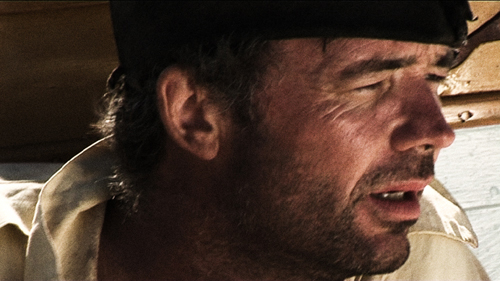
Here is your close up with and without the grain.
Hope this helps.
Roger
NOTE: The grain here looks more pronounced because I did it at the size of the posted image. Obviously, you can make the grain smaller by using a larger canvas, etc.
I have experimented a lot with fake film grain. Here is a technique that I use that's cheap and only takes a bit of your time to set up. First, create a canvas in Photoshop the size of your target frame. Make it with a white background. Then use the largest airbrush tool set at 20% pressure and on "dissolve". Use it to create about an overlapping pattern of grain like this:
From this you can get four usable frames by flipping horizontally and vertically and saving a copy of each. Thus, if you create, say, 30 of these original frames you can get 120 random grain pattern frames.
Then you number these frames and import them into Premier as an image sequence on the timeline. Then render out a copy and save as an AVI. You can then simply repeat this copy end to end for as long as you wish, then save that as another AVI. Then you'll have a master grain overlay that you can use to add grain to your video clips. You can use a standard overlay, multiply or screen overlay, depending on whether you want white grain, black grain, reversal or negative look. You can also invert the grain, depending on whether the scene has a dark or light background and how you want the grain to stand out. Just play with it until you get the look you want.
Here is your close up with and without the grain.
Hope this helps.
Roger
NOTE: The grain here looks more pronounced because I did it at the size of the posted image. Obviously, you can make the grain smaller by using a larger canvas, etc.
-
Scotness
- Senior member
- Posts: 2630
- Joined: Fri Jan 24, 2003 8:58 pm
- Location: Sunny Queensland, Australia!
- Contact:
Hi Roger thanks for that - yeah the fact that the grain wasn't moving in the redpaw plug in was the problem (fine for stills of course) - I'll give your method a go too - I hadn't thought of making my own grain clip by numbering grain frames after each other
thanks for the tip
Scot
thanks for the tip
Scot
Read my science fiction novel The Forest of Life at https://www.amazon.com/gp/product/B01D38AV4K
-
MovieStuff
- Posts: 6135
- Joined: Wed May 01, 2002 1:07 am
- Real name: Roger Evans
- Location: Kerrville, Texas
- Contact:
One thing about adding fake grain to 24P footage and 25P footage. If adding to 25P footage, there really aren't any issues. But if adding to 24P footage, you have to take into account that a 2:3 pulldown pattern might be present. The biggest problem I usually see is people add grain after the pulldown which means, of course, that the grain pattern does not have the pulldown pattern which is noticable, even if the audience can't quite figure out what the problem is. For 24P footage, you need to add the grain before you add the pulldown since the grain is supposed to be part of the film frame. That way the grain pattern has the same "stutter" characteristics as the rest of the film frames. It's subtle, to be sure, but can make quite a difference in believabliity of the effect. Likewise, if you are going to add any kind of gaussian blur to an overlay of the clip, you need to do that before you add the grain, since you don't want to blur the grain. In short, adding grain isn't that hard or complicated but the order in which you do it and the selection of overlay transparency filter can make a big difference in how well it comes across.
Roger
Roger
Last edited by MovieStuff on Sat Oct 13, 2007 3:11 pm, edited 1 time in total.
-
MovieStuff
- Posts: 6135
- Joined: Wed May 01, 2002 1:07 am
- Real name: Roger Evans
- Location: Kerrville, Texas
- Contact:
Not necessary, really. Just create the overlays and put them on the timeline and adjust to suit your taste. It doesn't have to be complicated to be believable. A bit of gamma and contrast adjustment to the original clip to bump the contrast and make it snappy, like a projection print, and you're pretty much there. Like Mattias pointed out, don't be afraid to blow out some whites and have some deep blacks. That's what film gives us on a regular basis and we never question it when it happens. We just accept it as the way film inherently looks. This is particularly important on outdoor shots, which in the case of your project, needs lighting to look a bit more uncontrolled to fit the asthetics that I think you are seeking which is rugged and raw. But even inside shots can benefit from having deep blacks some some snappy whites. It can really add dimension to the shot and make it seem less planned. Lighting is never perfect, particularly in days before they had lights! ;)Scotness wrote:Question Roger - would you reccomend doing this on the R, G and B channels?
Scot
Roger
-
Scotness
- Senior member
- Posts: 2630
- Joined: Fri Jan 24, 2003 8:58 pm
- Location: Sunny Queensland, Australia!
- Contact:
Thanks for that Roger - yes we shot 1080i at 25fps - the HDV is being (or has been) downconverted to SD for editing. There are plenty of blow out and dark spots! - the bleach bypass filter tends to accentuate that anyway.
I'll post a clip once I've done it.
Thanks all for your help
Scot
I'll post a clip once I've done it.
Thanks all for your help
Scot
Read my science fiction novel The Forest of Life at https://www.amazon.com/gp/product/B01D38AV4K
-
MovieStuff
- Posts: 6135
- Joined: Wed May 01, 2002 1:07 am
- Real name: Roger Evans
- Location: Kerrville, Texas
- Contact:
Progressive or interlaced? I assume that you went with progressive to retain some film-motion. The grain effect would look terrible on interlaced movement. Really cheesy. If you shot interlaced, make sure that you deinterlace before applying the grain. You'll lose a bit of resolution but it will look much better.Scotness wrote:Thanks for that Roger - yes we shot 1080i at 25fps....
Roger
-
Scotness
- Senior member
- Posts: 2630
- Joined: Fri Jan 24, 2003 8:58 pm
- Location: Sunny Queensland, Australia!
- Contact:
There's a great tutorial here I've just found
http://www.prime-junta.net/pont/How_to/ ... tml?page=5
with a whopping big grain map that's about 4000 x 3000 pixels across -
http://byscuits.com/grain-tm400.png
I'v just about finished all of the colour correction tweaks etc I was doing to Hold Me Tight and will get into this phase of it shortly. With a grain map that big it will be easy to create an avi of moving random grain. I'll post results soon.
Scot
Read my science fiction novel The Forest of Life at https://www.amazon.com/gp/product/B01D38AV4K